


Zoom Whiteboard: Collaboration made easy
An der TH Köln können Lehrende, Studierende und Mitarbeitende Zoom-Whiteboard kostenfrei nutzen. Es eignet sich besonders gut für interaktive Formate und Gruppenarbeit: Sei es bei digitalen Lehrveranstaltungen, in Workshops, beim Brainstorming oder in der Projektplanung – das Whiteboard unterstützt dabei, Ideen übersichtlich und kreativ zu gestalten.
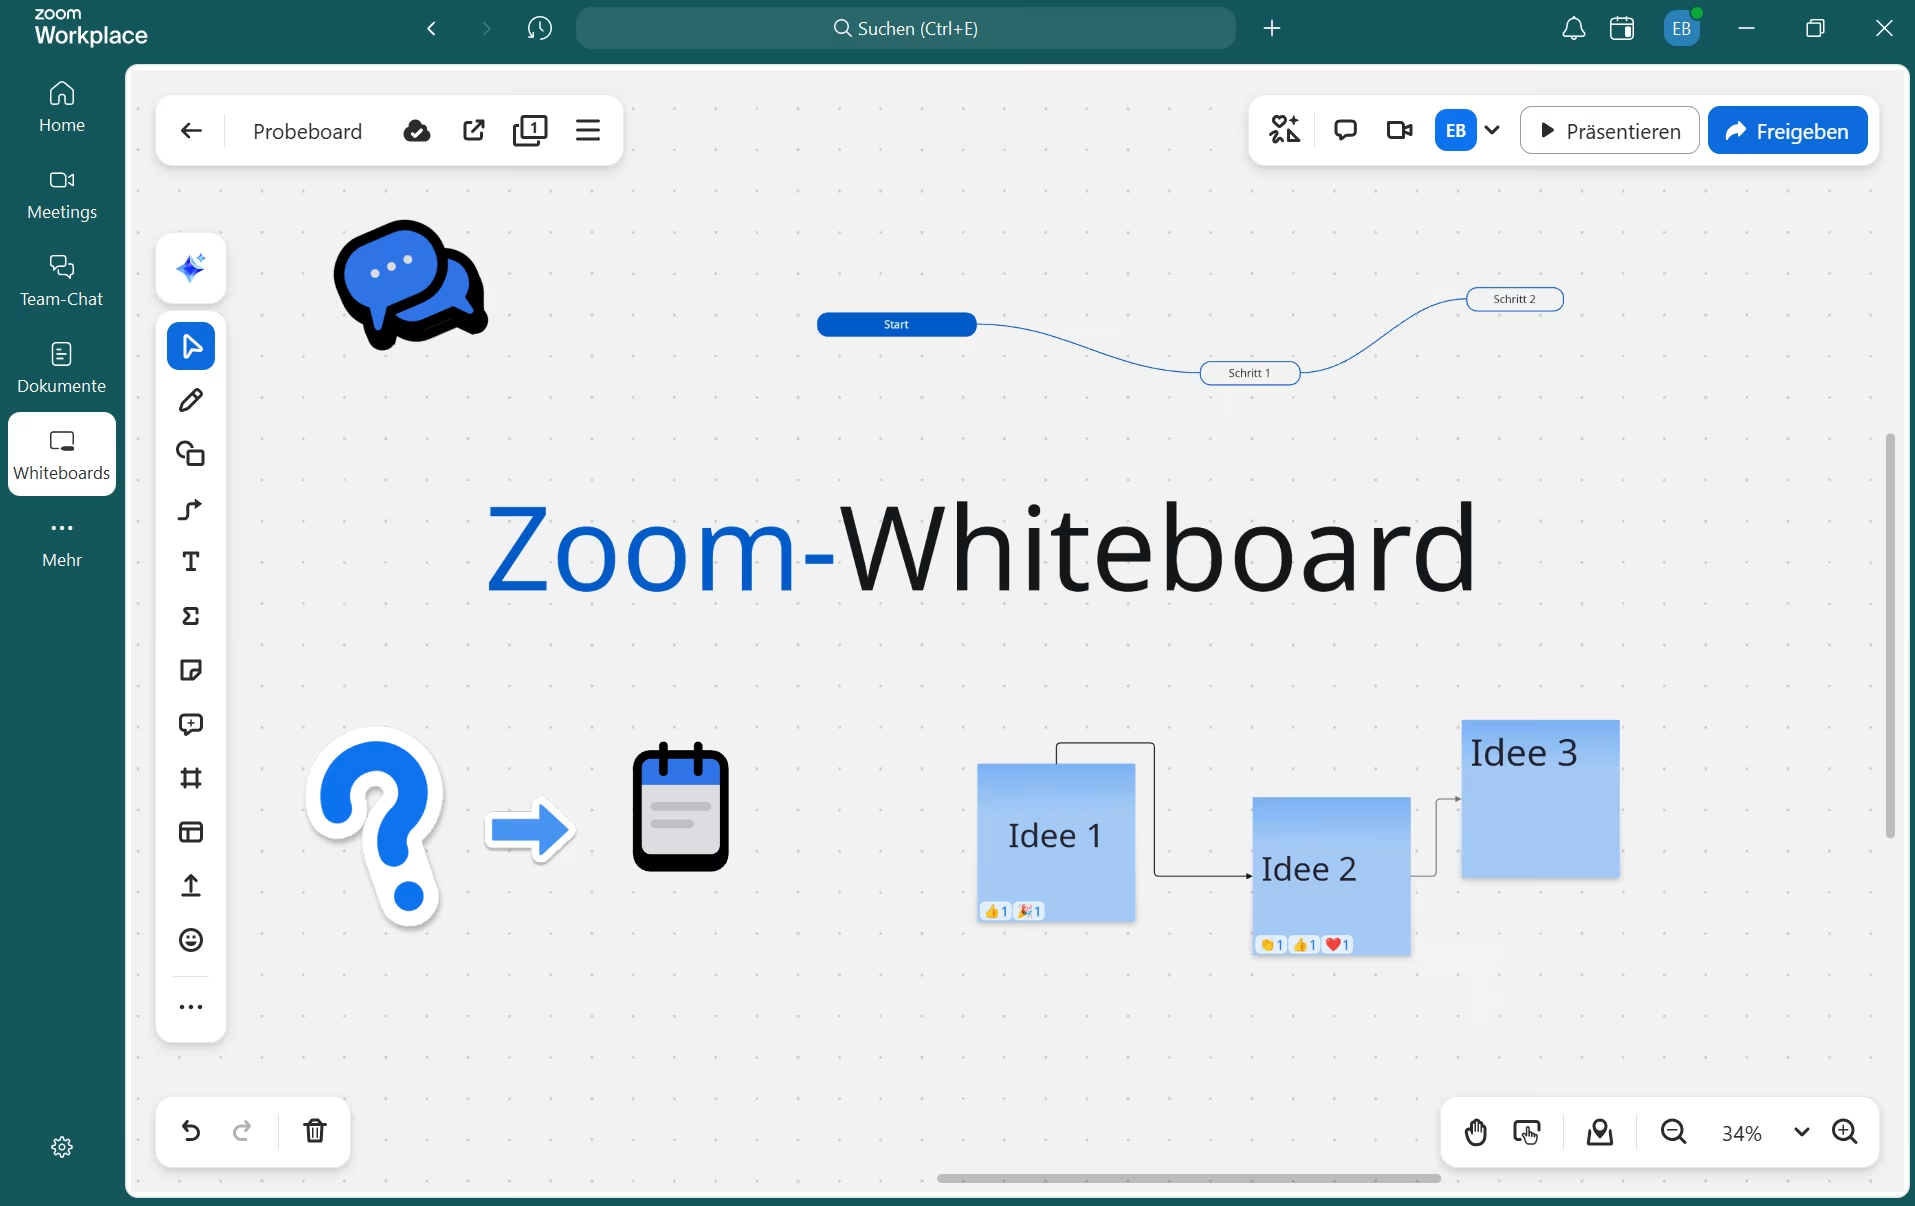
In a nutshell: What is Zoom Whiteboard?

FACTS
Link to the Tool: https://www.zoom.com/en/products/online-whiteboard/
Login: https://zoom.us/signin#/login
Licence: All students and staff have access to Zoom Whiteboard via the TH Köln’s existing Zoom licence.
TECHNICAL REQUIREMENTS
– Latest version of the Zoom desktop client for Windows, macOS or Linux
– Can be used in a browser (no installation of the Zoom client required)
– Stable internet connection
Zoom Whiteboard is a flexible digital whiteboard that enables collaboration with students regardless of location or time. Learners can work on tasks simultaneously, brainstorm ideas, visualise concepts and organise tasks. With various tools such as quick notes, text boxes, shapes, comments and mind maps, content can be designed creatively and interactively. The whiteboard also offers a wide range of templates that make it easier to create and organise content.
Due to the whiteboard’s tight integration with Zoom makes it’s easy to use in your course. You and your students do not need to switch between applications to work collaboratively – everything stays within the Zoom platform. Furthermore, key aspects such as data protection and IT security are already ensured, so you can focus entirely on the content and interactivity.
Data Protection & Accessibility
Zoom at TH Köln complies with the GDPR. Since March 2023, data has been stored on servers located in Germany. Further information on data protection can be found in the Zoom Data Processing Notice (German).
Information on Zoom’s accessibility can be found here.
Please note: Zoom whiteboards are not entirely accessible. If students have difficulty participating actively or passively due to a disability, the content needs to be made available in an accessible format.
Range of Features
What can the tool do?
- Brainstorm, plan and visualise ideas, concepts and strategies – with or without templates
- Work collaboratively in small teams
- Upload files and images and insert them into the whiteboard
- Create presentations
- Post comments anonymously or by name
- Save whiteboards, export them as PDFs or images, and reuse them
Uses
Step by Step
You can use Zoom Whiteboard via both your browser and the desktop app.
- In the desktop app, you’ll find the ‘Whiteboards’ tab at the top centre.
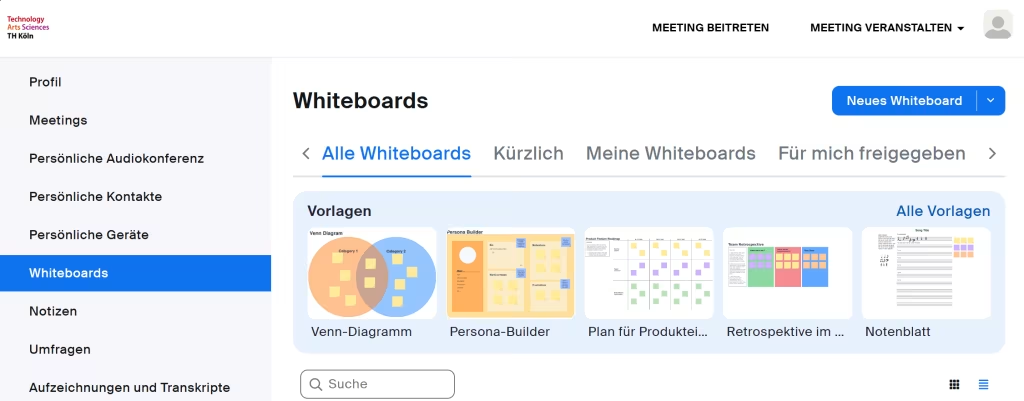
In your browser, you’ll find the ‘Whiteboards‘ section in the left-hand menu.
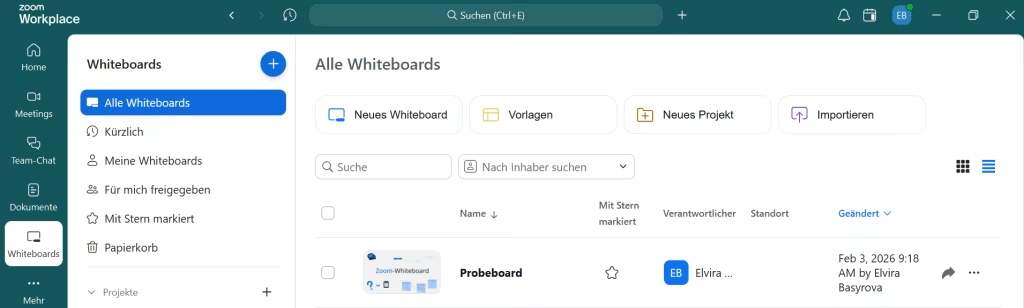
- Click on ‘New Whiteboard’ to create a new blank whiteboard or click on a template under ‘Templates’.
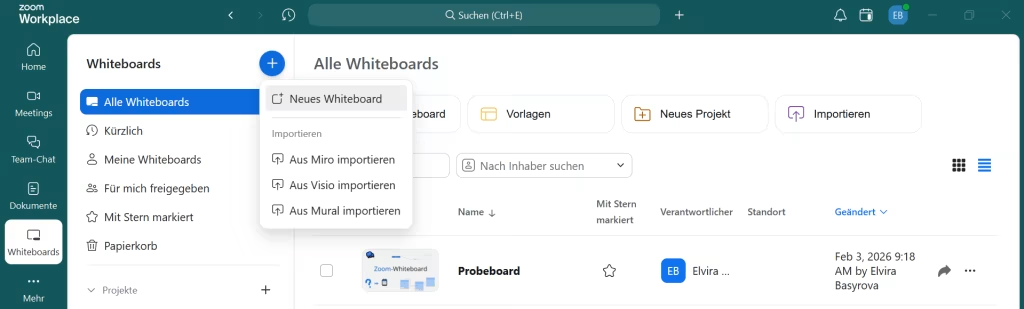
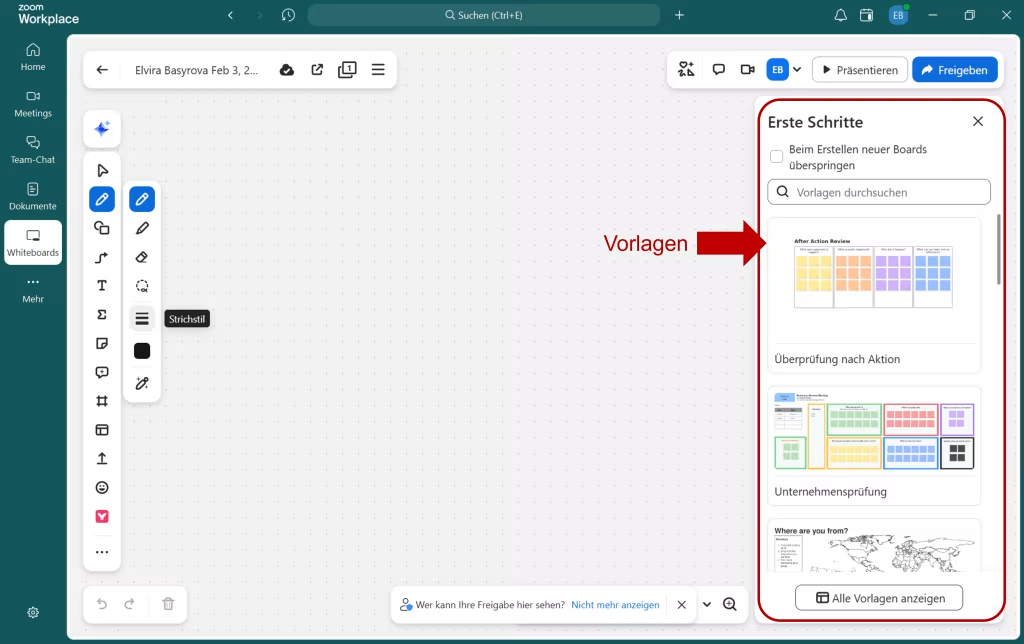
- You can also add templates to blank whiteboard after creation. To do this, click on ‘Templates’ in the toolbar.
- Set up the whiteboard as you wish. The whiteboard is continuously and automatically saved.
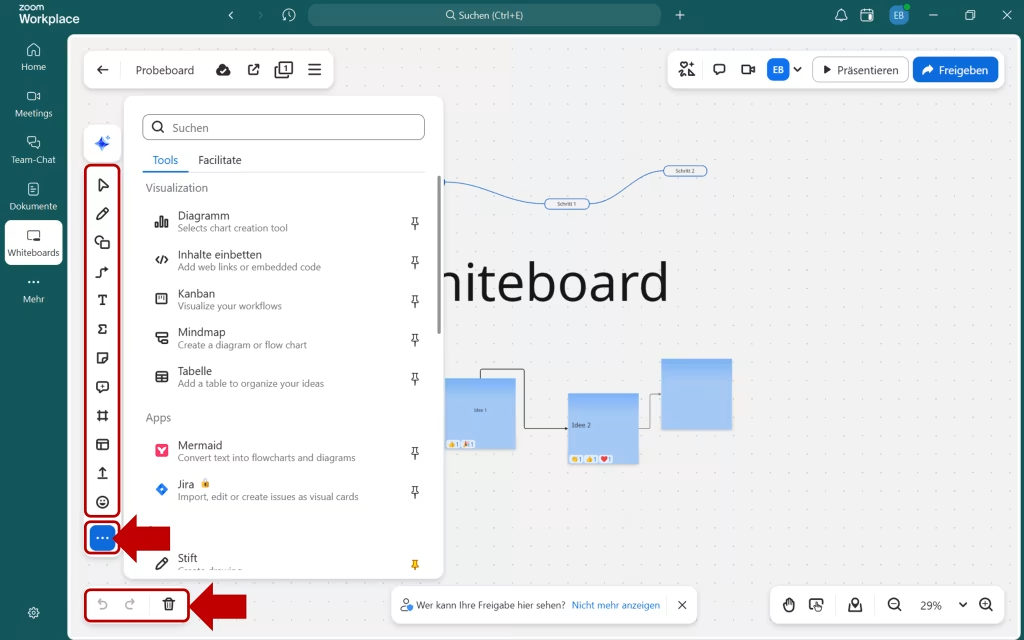
You can now create and insert various types of content. The left-hand menu is particularly useful for this, as it lists the individual tools one below the other: select pen, shape, line, text, quick note, comment, frame and so on to design your board. You can also insert other elements such as kanban boards, diagrams or code blocks.
In the bottom left-hand corner, you’ll find two arrows and a bin icon: the left arrow allows you to undo changes, the right arrow allows you to redo changes, and the bin icon allows you to delete the current page.
More about the individual elements and features: Using the whiteboard in Zoom: an overview of the individual tools (guide in German from the University of Bonn)
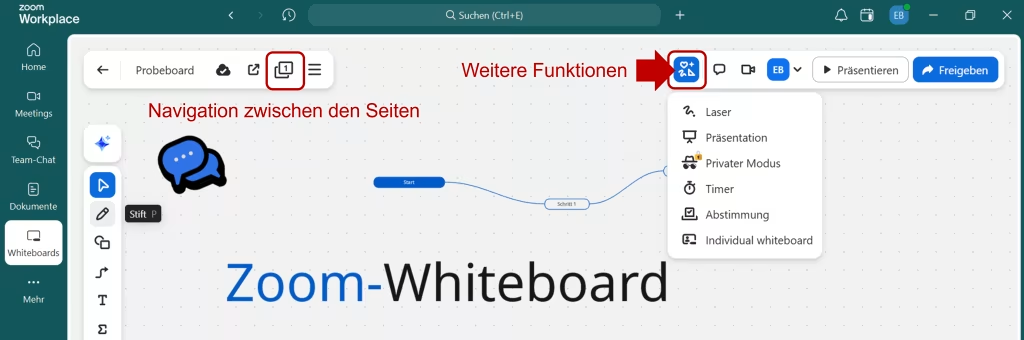
In the top left-hand corner, you will find a menu, which allows you to navigate between the pages of your whiteboard and activate presentation mode for the current page. You can also conduct polls on selected objects on your whiteboard, start a timer and activate a laser pointer.
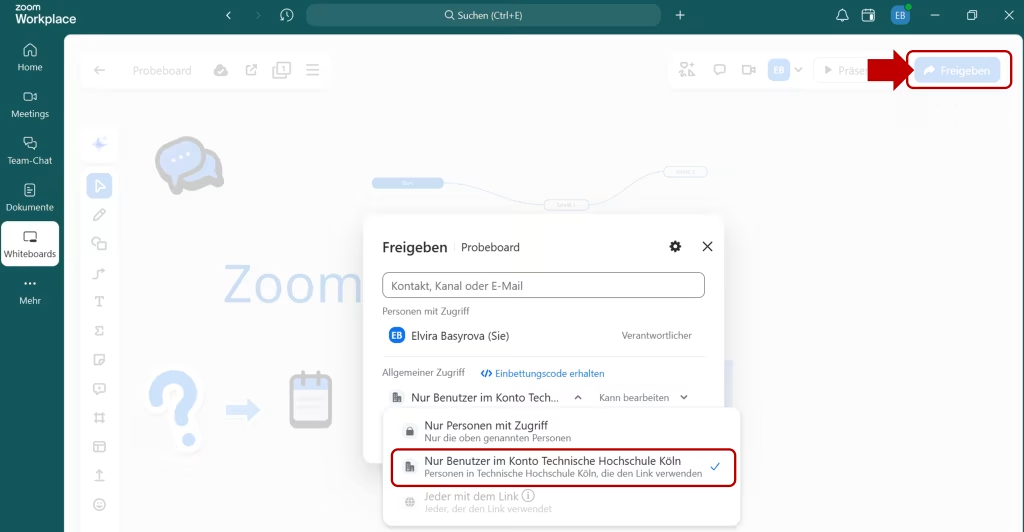
Once you have created a board, you can share it with other people. To do this, click the ‘Share’ button in the top right-hand corner of the whiteboard. Enter the email addresses of the people you wish to share the board with and decide what permissions you want to grant them. You can choose between editor (collaborate on the board), commenter (comment on content) or viewer (view only).
Important:
- The ‘Anyone with the link’ option is disabled at TH Köln. Please use the ‘Anyone at TH Köln’ option instead.
- You can only share your whiteboard with people who have an @th-koeln.de or @smail.th-koeln.de email address.
Practical tips
Bring some structure to your whiteboard! When working collaboratively, it’s a good idea to lock certain objects so that they aren’t accidentally moved or deleted. To do this, select the desired element and then click on the padlock icon.
All eyes on me! Mit dieser Funktion können Sie alle Mitwirkenden zu dem Bereich des Boards bringen, auf den sich alle konzentrieren sollen.
More focus, fewer distractions! Create content and templates for your classes in advance and hide it for a tidy, uncluttered whiteboard. You can reveal the content again at any time once it becomes relevant.
Any questions?
Feel free to contact us by mail to lehrpfade@th-koeln.de!
Links & literature
Header Image: © Zoom-Whiteboard, screenshot Zentrum für Lehrentwicklung (ZLE)