Padlet
Padlet is a collaborative web platform that allows you collect information from various sources. With Padlet, students participate actively by sharing notes, links, images, and videos—collaborative work becomes child's play. Learn how you can use the tool to involve students more, but also how you can use Padlet for your own work organization.

In a nutshell: What is Padlet?
FACTS
Link: https://padlet.com/
Login: E-Mail or Apple/Google account
Lizence: no licence at TH Köln
> free version 3 pin boards + 20 MB upload
> different fee-based tariffs
TECHNICAL REQUIREMENTS
– Internet connection
– Laptop, smartphone, or tablet
– Access possible via QR code
– Browser & App facilitates access >
Padlet is a digital pinboard to which any number of people can simultaneously add content. It doesn’t matter whether it’s text, images, videos, audio files, drawings or links; everything on a padlet can be freely moved, ordered, structured and visualized. Padlet is ideal for developing shared ideas and discussing specific topics. Participants can insert ideas anonymously or with their own name, but if they want to create (make) a padlet, they first need to create an account.
Range of Features
- Collect information (wikis, glossaries)
- Gather ideas, check prior knowledge (mind maps, impromptu surveys)
- Document and visualize work results
- Implement interactive learning content (links, images, documents, sketches, audio/video material)
- Gather anonymous feedback
- Manage tasks (e.g., timeline, scheduler, video wall)
- Enable working from anywhere
- Embed in other web platforms
Uses
Step by Step
- Sign up from the Padlet website with your email address, or with your Apple, Google, or Microsoft account.
- Choose Neon – the free version, or one of the paid versions (Gold or Platinum).
- After logging in, the Padlet Dashboard opens, showing already created and saved padlets—you can access them with a single click.
- To create a new padlet, click the Make a padlet button on the top right.

- Choose a template from the Basic Designs that best suits your purposes. It is advisable to think about what you intend to use the padlet for in your teaching before you start using it.

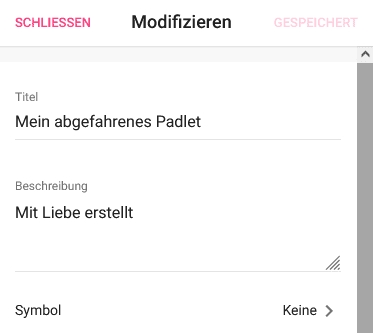
- Once you have created your new padlet, the Modify tab opens.
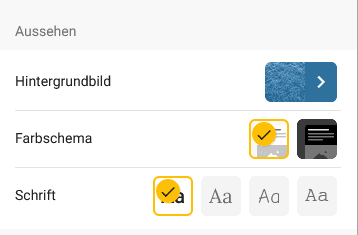
- Customize your padlet further by giving the pinboard (e.g., wall) a name and description, choose a background color, color scheme, font and more.
- Under Content Filtering, you can set whether comments first need to be approved by you before they are displayed on the padlet.
- With the Filter Profanity setting, you can have swear words replaced by emojis.
Screenshot Zentrum für Lehrentwicklung (ZLE)
Screenshot Zentrum für Lehrentwicklung (ZLE)
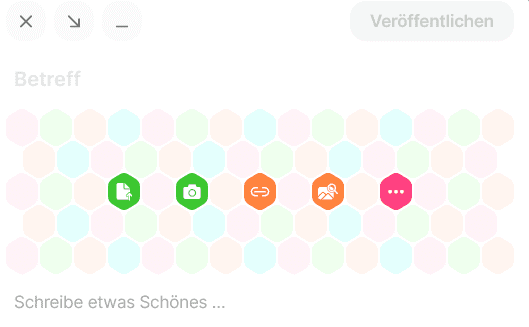
- Once you have customized everything to your liking, click Next and start filling your digital pinboard with content.
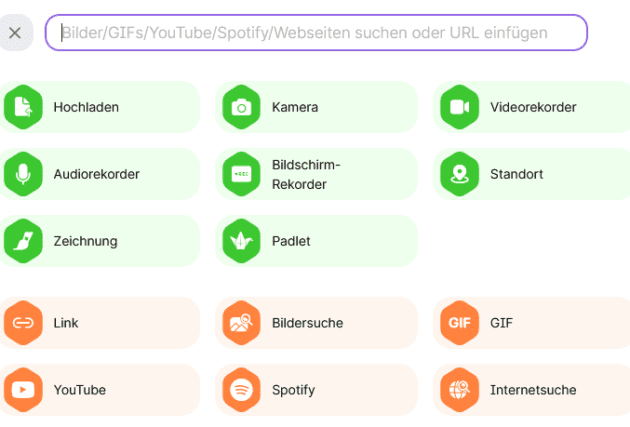
- You can use the plus sign (bottom right) to create a new post with title.
- Click on the three dots on the right of the box that then pops up to see even more options for the types of posts you can make.
Screenshot Zentrum für Lehrentwicklung (ZLE)
Screenshot Zentrum für Lehrentwicklung (ZLE)
- On the top right of the padlet you will see a menu with the following items:
- Heart: Favorite a padlet so that it appears at the top of your own list.
- Remake (arrows): Make a copy of your padlet to use as a template for later.
- Share: Invite others to work with you on your padlet. (see step 5) (siehe Schritt 5)
- Cogwheel: This takes you to the Modify tab, where you can adjust the settings of your padlet, including its appearance.
- Three dots: All the actions mentioned so far can be found bundled under the three-dots menu item. You can also change the initially selected design format, delete all existing posts on the digital canvas, export the padlet, or delete it entirely.
- Each padlet has a unique link that participants can use to work on the padlet. Alternatively, you can have a QR code created to share with participants. You can find both options under Share.
- Set what participants are allowed to do on the padlet; the default setting is Write.
- Under Share you can also adjust the privacy settings of the padlet. The default setting is Secret, so that only people who have the address of the padlet or the QR code can access it. Assign a password if you want to protect your padlet from unauthorized access.
- As soon as the participants have the link or the QR code of your padlet, the joint work can begin.
- Finally, the padlet can be exported with all its contents, either as an image, PDF, CSV, or Excel file. This function can also be found under Share.
Useful Tips
Incorporate Padlet into your teaching! Padlet, like most digital pinboards, is suitable for a variety of didactic approaches that can be used to activate students.
Alternative privacy compliant tools: Since Padlet is still considered problematic in terms of data protection, a suitable alternative tool might be TaskCards (German).
Any questions?
Feel free to contact us by mail to lehrpfade@th-koeln.de!